Wednesday, December 17, 2014

Technical Progress: Explore Arduino Adafruit Flora Board

Making velostat pressure sensor wasn't too difficult. As long as I got the top and bottom layer concept clear, it's quite easy to produce many of them.

Now, the challenge is how to connect the velostat pressure sensor with computer for input control.

I remember my classmate did a hand glove that allow user to generate input through the hashtag gesture. I decided to ask my friend about the Arduino logic and how I can turn the analog data from the pressure sensor into controlling flash-based interaction. 

From there, I was introduced Adafruit FLORA board. 

One good thing about Adafruit is that, they provide very resourceful learning system for their customer to expand the capabilities of their boards. FLORA board adapt Arduino codes, provided that developer has to download Adafruit library in order to demonstrate its features in Arduino environment. Keyboard library is available in Adafruit FLORA board. In this case, I can turn every pressure input into a keyboard control to activate my flash based content. 

Besides that, my main Joyslipper reference in the previous post is also using Adafruit FLORA board. I think this is the best start for the coding experiment. 


Instead of Using Arduino Application to code, I will have to download Adafruit version of Arduino Application.

With Adafruit version of Arduino, there are library specially dedicated for the Neopixel shoes, using velostat pressure sensor to control LED lights.


Tuesday, December 9, 2014

Digitize Storyboard

Although I haven't fully confirmed the visual idea I am suppose to create, I carry on transfer my storyboard sketches into digital look. During the visual transferring stage, I realized that if I am going to use vector graphic to make the complete video, it's going to be very time consuming. 

Since I haven't come into a clear conclusion of my visual idea, I thought of combining vector and realistic video footages to solve the technical issue of time consuming visual production. The other concern I have is the difficulty of creating the right angle for the vector world. As my project aim to create a visual illusion art work that engage user's attention, the visual has to be believable. Shooting real video footages and turn them into monochromatic mode could allow me to produce believable angle in a shorter time frame. But the challenge for this solution will be, to scout for location to film the video, the equipment required, to get approval for shooting video at the public place and etc.

While having these thoughts in my mind, I still need to test out the visual experience for my storyboard. So below are the first draft of the storyboard. 

Scene 1


Scene 2


Scene 3


Scene 4


From Scene 1 to Scene 4, I manage to make the graphic all in vector format. The challenge will be to get the perspective right. And the next step is to consider how these scenes are going to look like during the animation stage. Some graphic elements need to be able to flexibly adjusted for animation purposes.


Scene 5


Scene 6


Scene 7


From Scene 5 to Scene 7, I faced the challenge to create woods environment from such wide variety of angles. Therefore I decided to choose some of the high res photos from the internet to use as my footage sample.


Scene 8


Since 8 suddenly turn back to a very vector style visual. Personally I wasn't very happy with the result. But due to my struggle of time management issue during this Christmas festive season, I compromised for the sake of meeting my minimum production timeline.

Monday, November 24, 2014

Finalize Storyboard

I've been struggling a lot to settle the storyline and how illusion art could play a role in the storytelling, so here's the story flow!

Cinematography Reference: Wilderness Downtown (pop-up window, parallel sequence)
Sound: A Series of Unfortunate Event (opening title sequence music)


Thursday, November 20, 2014

Technical Progress: DIY Pressure Sensor Test 1

I waited a month before the velostat delivered to me. Feel so excited trying out the DIY pressure sensor. For the time being, I have no Conductive Fabric to connect the cables, so use Aluminium foil to replace as a temporary solution.

Multimeter at the top left corner helped me to measure the resistor that works for my velostat as different thickness and materials will have different value to electric resistance.  


DIY a crocodile head cable


 Detail explanation in the video below


Info from > https://www.sparkfun.com/tutorials/389

Testing Arduino Connectivity & Coding


Monday, November 10, 2014

Perspective Tool + Art Style Testing

I am still quite slow in my visual development so far. My proposed art style was an experimental art style that I'm not familiar with. Therefore, I took very long time to decide the visual approach for the project. 


Throughout this process, I realised that I am a very safe designer. Lacking of guts to experiment in my final year project. The unpredictable feeling drags me on and on. I keep looking at references, and some time lost in references too.

Although I have such struggle, I still have to meet the timeline proposed. So I thought of trying out the style using Adobe Illustrator to create something. At least something that keeps me going.

The image above is one of my visual testing, playing with alphabet and trees in a perspective mode. This work is created to test on user perspective while walking in the forest in first person point of view.

Tuesday, November 4, 2014

Parallel Sequence, Multiple Screen Narrative Sample Analysis

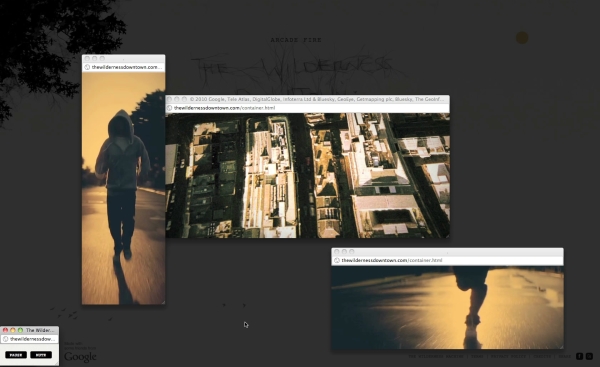
Example 1: The Wilderness Downtown

Wilderness Downtown project is an experimental interactive narrative project. By using the latest html5 web video feature from Google Chrome, this project uses pop-up windows to engage viewer attention. Instead of watching an ordinary film on the browser, there will be browser window pop up and close simultaneously to composite the entire viewing experience.

Other than pop-up and close browser windows in different timeline, some of the pop-up windows (the bird flying pop-up window) will move towards the center window and then the center window will have the same bird flying into its video. This gives viewer a "magical feeling" as if the birds are flying across the browser windows. (refer to Screenshot 2)

The other feature of this project is the integration of Google Street View into the music video. By typing in a US address, viewer can see their address street view appeared in the video from top view and street view. Computer generated graphics will also overlay on the video to make it as part of the story.


Below are more analysis and observation made on some of the narrative scenes:
[Screenshot 1]
A layout composition made of browser window engage viewer to pay attention the different scenario at the same time. Compared to watching traditional film in cinema or on TV, this is a different experience all together. 


[Screenshot 2]
(explained on the 2nd paragraph above)


[Screenshot 3]
The main character that leads the viewer attention starts from running. And on which ground/environment he's running on, the pop-up windows explain that further. In this scene, while the main character stop and turn around, the top left window of the chosen location that presented from a bird-eye view responding to the character's action and turn as well. 


[Screenshot 4]
Similar narrative with Screenshot 3, the continuous scene of it.


[Screenshot 5]
This part shows the other interactive feature of the project. Viewer are invited to key in the message he or she wants to talk to the younger self to remind them to care for the environment. The 3 blue-ish box at the bottom left corner are mini video of machines response to viewer's mouse click and keyboard activity. View can use his/ her mouse to draw branches. Once viewer's input the completed, computer generated graphic bird will rest on the viewer generated branches. Then these birds will also flying across the pop-up window into the city top view.


[Screenshot 6]
The main character remain running. But this time, it's from a lower angle to review the growing tree behind him. These tree are also simultaneously growing in viewer's chosen city on top view angle and street view angle. 


[Conclusion]
I find this reference helpful because it has the "illusion" and "magical" element in the viewing experience. Instead of choosing optical illusion art style, this video uses realism technique. Blurring the boundary of real and fact to create a make believe narrative the makes viewer's environment part of the narrative content.

Besides that, the choice of media and technology is also very creative. It effectively create an engaging viewing experience by using pop-up windows, viewer choice of location, viewer's personalized messages being responded with the animated birds... and etc.