After the in-class user test with our junior, I collected variety of feedbacks. Most obvious and consistent feedback is the instruction. My project is very experimental and artistic. I need to figure out a very subtle way to hint user how to interact with my project. Right now, there's no instruction at all. Other than lacking of instruction, another challenge in the usability of my project is the confusion of when to start walking, when to stop walking.
My interactive narrative experience is designed in such way that user will walk at some part and rest to watch some animation, then continue. I need to think about how to make a silent, yet clear indication to inform user such transition. So far I haven't got any idea how to do it yet.
Since my project appeared to be very inviting during the user testing day, everyone feels like walking on the shoes pad to find out what is going to happen on the screens, plus there are 3 monitor screens. It's catchy enough to attract viewer's attention. Most people answered they are willing to explore the interactive journey.
Regarding the viewer's point-of-view, there are mixture of preferences between first person and multiple point-of-view. I think it all depends on the final animation of the project.
Most user responded that they are willing to spend about 1 minute to less than 3 minutes time exploring the project. So I guess my concern if time wasn't a major issue now.
Wednesday, January 14, 2015
Friday, January 9, 2015
External Guest Comments + Drafting User Test Questions
At this production stage, technical solution is roughly figure out. The pressure sensor work fine with Arduino Leornado board, controling flash-based animation content.
My overall production progress at week 8 is about 50% completion. There are few aspect to cover in my production stage: Arduino coding, Flash AS3 coding, Animation and sound.
The Arduino coding, Flash AS3 coding is about 60% done. While Animation, according to the initial storyboard, I have more than 10 scenes to complete. And right at this stage, I'm at the very 3 scenes only. It took me very long time to figure out how to turn stagnant storyboard into smooth and illusionary animation. Some times to figure out the transition and make sense to that viewer, as well as the timing allocated for viewer to watch what's going on in each scene takes time to test it through.
[External Guest Feedback]
Because of that, I had very limited content to put into user test. After receiving feedbacks and comments given by Benedict Tan, an invited guest from the industry, he pointed out the strength of my entry scene. The visual reference from "Down The Rabbit Hole" by Rasch was a very inviting opening to invite user "walking" into the interactive narrative world of my project.
But when Ben came and visit our project production, some the 70% of the animation was still in flat storyboard view. In addition to that, I struggled in telling story at the first person point of view especially at woods scene. So some of the journeys were designed in 3rd person point of view instead of consistently using first person point of view throughout.
There's a discussion about the point of view for user. And I think it'll be good to find out during the user test in the following week.
Besides that, I also agreed with Ben when he said that my visual should stick to mostly black and white strong vector style to bring out the illusionary experience. While at that time, my storyboard has the mixture of real world scenery and vector graphic that created a collage style of art instead of optical illusionary art. (refer to Digitized Storyboard post)
Other than the art style issue, I am also concerning about the length of the animation. Since it's still at the very beginning stage of the animation production, I wonder if the final animation will be too long to keep viewer's attention.
Based on some of the questions I had in mind, I draft out the user test questions to get some feedback I needed to carry on my project production. Meanwhile, I think I will have to re-work on the art style of some of my animation scenes.

Friday, December 26, 2014
Technical Progress: FLORA Board to Arduino Leornado
After few round of testing on Adafruit FLORA board, I still faced problem connecting the circuit and coding the keyboard control.
Therefore, Yee Siang recommend me to explore Arduino Leornado Board, an Arduino board that has built-in keyboard integration. I can connect the circuit like most of the Arduino board, no extra library needed. I agreed with the suggestion too. Since I am considering investing one Arduino board that allow easy flash integration, this is a stable choice.
I ordered one Arduino Leornado online from a local seller and give it a try so that I can meet the deadline of Alpha test on week 8 (after the New Year holiday).
Once I received the board, it took me few days to understand the board by testing out some of the codes shared online.
Example:
Keyboard Message - Arduino Leornado
Keyboard Modifiers - Arduino Leornado
My main challenge is to get Arduino Leornado to pass sensor info to computer and turn them into keyboard input. The two links above helps me to grab the concept, then adapt them into pressure sensor analog data condition.
Along the way of testing, I tested the input with 2 or more pressure points to see how I can allow more variety of user control.
But due to different sensor point has a different "minimum number" and "maximum number" at it's before and after pressure. Some times when I plug the input pin at the wrong place, it will trigger a infinite keyboard press on my computer, and it got my workstation hang for many times.

After few times of such "disaster", I learnt my lesson and carefully label all of the wiring so that no more "computer hang" incident will ever happened again.
Therefore, Yee Siang recommend me to explore Arduino Leornado Board, an Arduino board that has built-in keyboard integration. I can connect the circuit like most of the Arduino board, no extra library needed. I agreed with the suggestion too. Since I am considering investing one Arduino board that allow easy flash integration, this is a stable choice.
I ordered one Arduino Leornado online from a local seller and give it a try so that I can meet the deadline of Alpha test on week 8 (after the New Year holiday).
Once I received the board, it took me few days to understand the board by testing out some of the codes shared online.
Example:
Keyboard Message - Arduino Leornado
Keyboard Modifiers - Arduino Leornado
My main challenge is to get Arduino Leornado to pass sensor info to computer and turn them into keyboard input. The two links above helps me to grab the concept, then adapt them into pressure sensor analog data condition.
Along the way of testing, I tested the input with 2 or more pressure points to see how I can allow more variety of user control.
But due to different sensor point has a different "minimum number" and "maximum number" at it's before and after pressure. Some times when I plug the input pin at the wrong place, it will trigger a infinite keyboard press on my computer, and it got my workstation hang for many times.
After few times of such "disaster", I learnt my lesson and carefully label all of the wiring so that no more "computer hang" incident will ever happened again.
Monday, December 22, 2014
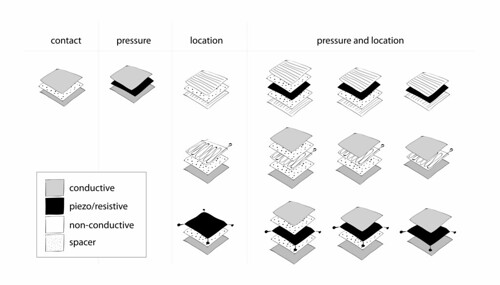
Technical Progress: Velostat Pressure Sensor - Multiple Input
The first trial of DIY pressure sensor successfully detect the analog output from the changes of voltage when input weight is added onto the sensor. To create the pressure sensor, the pressure pad is separated into 2 part, the top part connected to the 5 volt pin on the Arduino board and the bottom part connected to the Ground pin. If there's contact between the top part and the bottom part, it'll be a complete circuit. No voltage loss.

For pressure sensor, it means there's voltage changes when force is added upon the sensor. A layer or 2 of velostat is added to avoid direct contact of the top and bottom of the pressure sensor. Once the velostat layer is pressed, it will trigger analog voltage changes. This set of pressure sensor will need to connect with a resistor of atleast 1K ohm.
To work on multiple velostat detection like my reference Joyslipper 2, I need to find example online that has same circuit connection with multiple analog output and resistors connections on the bread board.
At last, I found this circuit diagram that connects three potentiometers together, fits my requirement pretty well.

It took me quite a while to find this. But it's really helpful. I used this circuit to work on my latest slippers connection.
For pressure sensor, it means there's voltage changes when force is added upon the sensor. A layer or 2 of velostat is added to avoid direct contact of the top and bottom of the pressure sensor. Once the velostat layer is pressed, it will trigger analog voltage changes. This set of pressure sensor will need to connect with a resistor of atleast 1K ohm.
To work on multiple velostat detection like my reference Joyslipper 2, I need to find example online that has same circuit connection with multiple analog output and resistors connections on the bread board.
At last, I found this circuit diagram that connects three potentiometers together, fits my requirement pretty well.
Wednesday, December 17, 2014
Technical Progress: Explore Arduino Adafruit Flora Board
Making velostat pressure sensor wasn't too difficult. As long as I got the top and bottom layer concept clear, it's quite easy to produce many of them.


Now, the challenge is how to connect the velostat pressure sensor with computer for input control.
I remember my classmate did a hand glove that allow user to generate input through the hashtag gesture. I decided to ask my friend about the Arduino logic and how I can turn the analog data from the pressure sensor into controlling flash-based interaction.
From there, I was introduced Adafruit FLORA board.
One good thing about Adafruit is that, they provide very resourceful learning system for their customer to expand the capabilities of their boards. FLORA board adapt Arduino codes, provided that developer has to download Adafruit library in order to demonstrate its features in Arduino environment. Keyboard library is available in Adafruit FLORA board. In this case, I can turn every pressure input into a keyboard control to activate my flash based content.
Besides that, my main Joyslipper reference in the previous post is also using Adafruit FLORA board. I think this is the best start for the coding experiment.
Instead of Using Arduino Application to code, I will have to download Adafruit version of Arduino Application.
With Adafruit version of Arduino, there are library specially dedicated for the Neopixel shoes, using velostat pressure sensor to control LED lights.
Tuesday, December 9, 2014
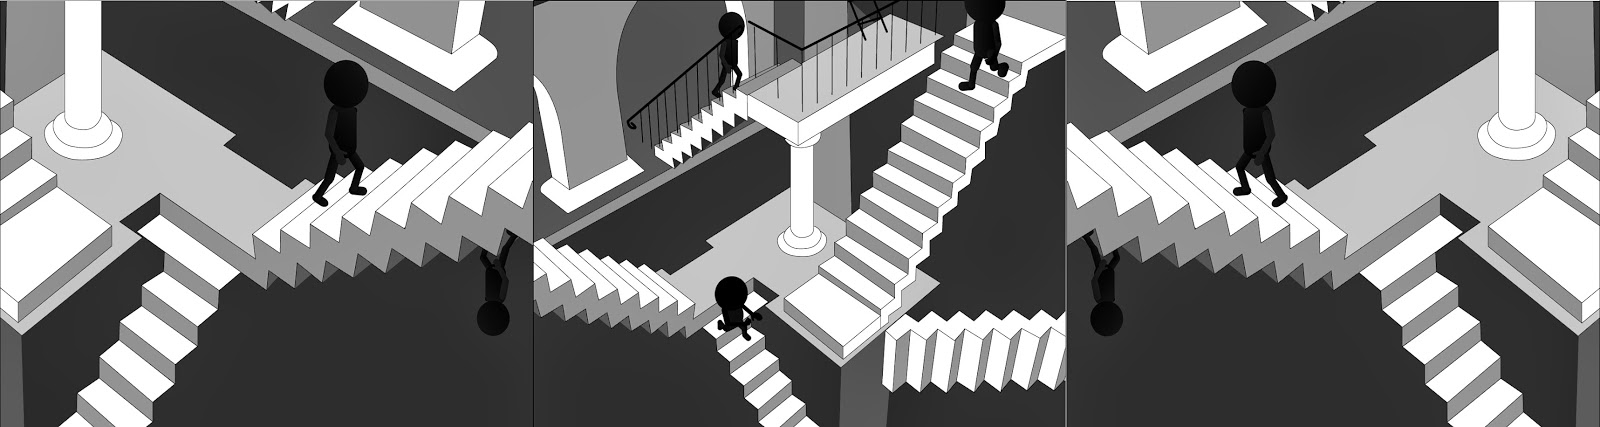
Digitize Storyboard
Although I haven't fully confirmed the visual idea I am suppose to create, I carry on transfer my storyboard sketches into digital look. During the visual transferring stage, I realized that if I am going to use vector graphic to make the complete video, it's going to be very time consuming.
Since I haven't come into a clear conclusion of my visual idea, I thought of combining vector and realistic video footages to solve the technical issue of time consuming visual production. The other concern I have is the difficulty of creating the right angle for the vector world. As my project aim to create a visual illusion art work that engage user's attention, the visual has to be believable. Shooting real video footages and turn them into monochromatic mode could allow me to produce believable angle in a shorter time frame. But the challenge for this solution will be, to scout for location to film the video, the equipment required, to get approval for shooting video at the public place and etc.
While having these thoughts in my mind, I still need to test out the visual experience for my storyboard. So below are the first draft of the storyboard.

Scene 1
Scene 2

Scene 3

Scene 4
From Scene 1 to Scene 4, I manage to make the graphic all in vector format. The challenge will be to get the perspective right. And the next step is to consider how these scenes are going to look like during the animation stage. Some graphic elements need to be able to flexibly adjusted for animation purposes.

Scene 5

Scene 6

Scene 7
From Scene 5 to Scene 7, I faced the challenge to create woods environment from such wide variety of angles. Therefore I decided to choose some of the high res photos from the internet to use as my footage sample.

Scene 8
Since 8 suddenly turn back to a very vector style visual. Personally I wasn't very happy with the result. But due to my struggle of time management issue during this Christmas festive season, I compromised for the sake of meeting my minimum production timeline.
Monday, November 24, 2014
Finalize Storyboard
I've been struggling a lot to settle the storyline and how illusion art could play a role in the storytelling, so here's the story flow!
Cinematography Reference: Wilderness Downtown (pop-up window, parallel sequence)
Sound: A Series of Unfortunate Event (opening title sequence music)


Subscribe to:
Comments (Atom)